How to Make a Gift Basket That Looks Professional (Step by Step)
Free printable
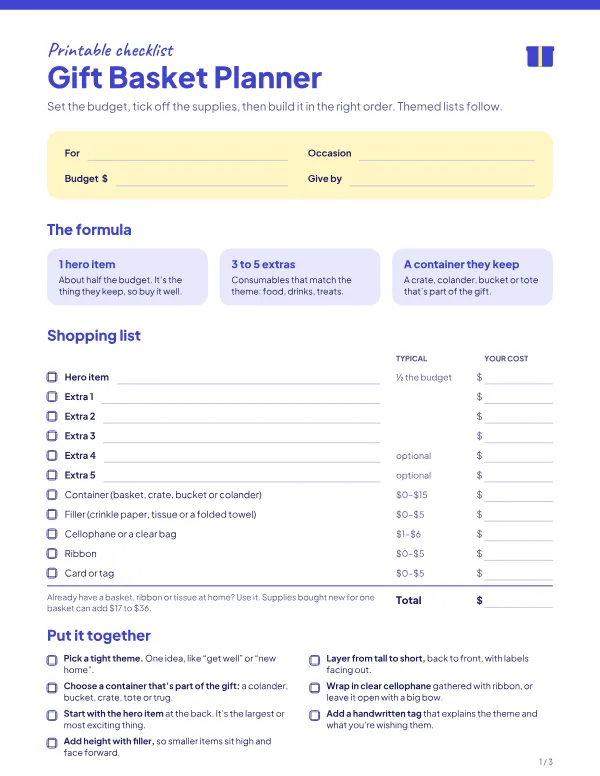
Gift basket planner and checklist
Budget, supplies and assembly steps on one page, then shopping lists for eight themed baskets with space for costs.
A homemade gift basket can look like it came from a boutique or like a pile of shopping in a box. The difference isn't how much you spend. It's a handful of techniques: a base that lifts everything up, a clear theme, one standout item, and wrapping pulled tight.
This guide covers every step in order, from setting the budget to tying the bow. It takes about an evening the first time and under an hour once you've done it. If you haven't picked a theme yet, browse our gift basket ideas by occasion first, then come back here to build it.
What you need
- A container, such as a basket, crate, tub, bowl or tote
- Something for the base: a folded towel, crumpled paper or a foam block
- Crinkle-cut paper shred, about one 2 oz bag per medium basket
- One hero item and four to six smaller items
- A cellophane basket bag or a roll of cellophane
- Ribbon, about 1 to 1.5 yards
- A gift tag or card
- Optional: glue dots, clear tape and scissors
Step 1: Pick a theme and set a budget
Every good basket has one clear idea: “spa night”, “Sunday pancake breakfast” or “get well soon”. A theme tells you what to buy and, just as importantly, what to leave out. A basket that tries to cover everything ends up looking like a random pile.
Then set a budget, and remember the supplies. A container, filler, cellophane, ribbon and a tag cost $5 to $10 from a dollar store or $20 to $35 bought new, which can be a third of a $50 budget. Our free gift basket cost calculator prices it all for you: pick one of eight themes and a budget, and it gives you a shopping list with typical prices, the cost of supplies, and how the total compares with buying a similar basket ready-made. For the full breakdown, see is it cheaper to make a gift basket?
Step 2: Choose the hero item
The hero item is the one thing they’ll keep and remember, such as a throw blanket, a good mug, a pour-over coffee set or a cheese board. It should take about half the budget, and everything else fills in around it. Our gift baskets under $50 are all built on this formula.
Not sure what fits your theme? Our guide to what to put in a gift basket lists the hero items and extras for the most popular themes.
Step 3: Choose a container that’s part of the gift
The cheapest container is one that’s useful afterwards: a colander for a pasta basket, a popcorn bowl for a movie night, a galvanised tub for a BBQ basket, a tote for a beach basket, or a mixing bowl for a baking basket. That way, the container is part of the present rather than something that ends up in a cupboard.
| Container | Best for | Cost |
|---|---|---|
| Wicker basket | Classic look, any theme | $3 (dollar store) to $15 |
| Wooden crate | Coffee, wine, food | $5 to $15 |
| Galvanised tub or bucket | BBQ, garden, beach | $5 to $12 |
| Colander, bowl or pot | Food and kitchen themes | $5 to $20 |
| Tote bag | Beach, get well, travel | $3 to $15 |
| Box with a lid | Shipping, or anything you’ll post | $2 to $8 |
Supplies are much cheaper at a dollar store, craft store sale or second-hand shop. Our guide to where to buy gift basket supplies compares the options.
Step 4: Build the base
This is the step that separates a professional-looking basket from a homemade one. Items should sit high, near the rim, where they can be seen. If you drop them straight into the container, they sink and disappear.
- Fill the bottom third to half with something bulky: a folded towel (which can be part of the gift), crumpled newspaper, bubble wrap or a foam block cut to size.
- Cover it with crinkle-cut paper shred. Fluff it up with your fingers so it looks full. One small bag is usually enough.
- Press a slight hollow where the hero item will go.
In a deep container, an upturned box or a smaller bowl makes a quick platform.
Step 5: Arrange from tall to short
Think of a theatre: the tallest seats go at the back.
- Put the hero item in first, at the back or in the centre, tilted slightly forward.
- Add tall items (bottles, boxes, rolled towels) around the back and sides.
- Fill the front with short items, like jars, bars and small packets.
- Turn every label to face out.
- Tuck small items into gaps, such as tea bags, lip balm or candy, so there are no holes.
- Step back and look from the front. Nothing important should be hidden.
Use glue dots on the underside of anything that slides, especially if the basket will be carried or posted.
Step 6: Wrap it
For most baskets, a clear cellophane bag is the easiest wrap. Slide the basket into the bag, gather the top above the tallest item, and tie it tightly with ribbon. Trim the top so it fans out evenly.
For a tighter look, use shrink-wrap basket bags. Place the basket inside, gather and tie the top, then heat the bag evenly with a hair dryer on a high setting until it tightens around the contents. Keep the dryer moving so the plastic doesn’t melt.
If you’d rather go without plastic, leave the basket open, with a large bow tied to the handle and the contents packed tightly enough not to fall out.
Step 7: Add the card
A handwritten tag explains the theme and turns a pile of nice things into a gift: “For your first night off in the new house” or “Everything you need to rest up”. Tie it to the ribbon or tuck it in at the front. For Christmas baskets, our free printable gift tags have a Christmas set.
If you’re shipping the basket
A DIY basket packed for hand delivery won’t survive a courier. If you need to post it:
- Use a box, not a basket, or put the basket inside a sturdy shipping box with padding on all sides.
- Wrap glass jars in bubble wrap and put them in the centre.
- Skip chocolate in warm weather, and anything that can leak.
- Check the cost first. Shipping a packed basket can cost $15 to $35 within the US, which sometimes makes ready-made the better deal. The cost calculator includes shipping in its comparison.
Common mistakes
- No base. Items sink and the basket looks half-empty.
- Too many small things. Ten $2 items look like clutter. One good item plus five extras looks generous.
- No theme. A random mix looks like leftovers.
- Loose cellophane. Gather it tightly, or it looks like a bin bag.
- Buying supplies for one basket. A roll of cellophane wraps ten. Make several at once, or keep the leftovers for next time.
Plan it on paper
Our free gift basket planner and checklist has the budget, supplies and these steps on one page, plus shopping lists for eight themed baskets. For builds by budget, see our gift basket ideas on a budget (under $30) and Dollar Tree gift basket ideas. For specific themes, start with our spa gift basket or Christmas gift basket ideas. Short on time? See our last-minute gift basket options, from same-day delivery to a 30-minute build.
Frequently asked questions
What do you put in the bottom of a gift basket?
A base to lift the contents: a folded towel, crumpled newspaper, a foam block or an upturned box. Cover it with crinkle-cut paper shred so the base is hidden. Items should sit near the rim, not sink to the bottom.
How many items should be in a gift basket?
One hero item plus four to six smaller items is the sweet spot for most baskets. Fewer looks sparse; many more looks cluttered unless the container is large.
How do you keep items from moving in a gift basket?
Pack the base and filler tightly, tuck tall items deep into the filler, and use glue dots or a little tape on the underside of anything that slides. A tight cellophane wrap holds the rest in place.
How much does it cost to make a gift basket?
Usually $25 to $75, depending on the theme and hero item. Supplies add $5 to $10 from a dollar store or $20 to $35 bought new, which is why reusing a container saves the most.
How far in advance can you make a gift basket?
Two or three days for baskets with fresh food, and up to a couple of weeks for non-perishables. Keep it somewhere cool and out of direct sun, especially if it contains chocolate.